1. 이벤트
- 마우스 클릭, 키보드 입력, 이미지나 HTML 문서의 로딩, 타이머의 타임아웃 등 사용자의 입력 행위나 문서나 브라우저의 상태 변화를 자바스크립트 코드에게 알리는 통지(notification)
2. 이벤트 리스너
- 발생한 이벤트에 대처하기 위해 작성된 자바스크립트 코드
3. 이벤트 종류
- HTML5에서 이벤트 종류는 70여가지
- 이벤트 리스너 이름은 이벤트 이름 앞에 on을 덧붙임
예) onmousedown : mousedown 이벤트의 리스너
onkeydown : keydown 이벤트의 리스너
4. 이벤트 리스너 만들기
- 3 가지 방법
HTML 태그 내에 작성
DOM 객체의 이벤트 리스너 프로퍼티에 작성
DOM 객체의 addEventListener() 메소드 이용
- HTML 태그 내에 이벤트 리스너 작성
HTML 태그의 이벤트 리스너 속성에 리스너 코드 직접 작성
예) <p>태그에 마우스 올리면 orchid, 내리면 흰색으로 배경변경

|
1
2
3
4
5
6
7
8
9
10
11
12
|
<!DOCTYPE html>
<html lang="en">
<head>
<meta charset="UTF-8">
<meta name="viewport" content="width=device-width, initial-scale=1.0">
<title>Document</title>
</head>
<body>
</body>
</html>
http://colorscripter.com/info#e" target="_blank" style="color:#4f4f4ftext-decoration:none">Colored by Color Scripter
|
http://colorscripter.com/info#e" target="_blank" style="text-decoration:none;color:white">cs |

5. DOM 객체의 이벤트 리스너 프로퍼티에 작성
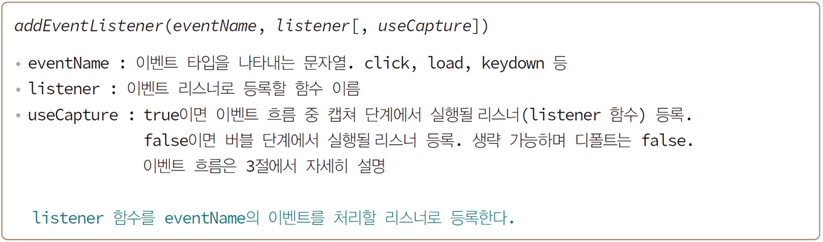
- addEventListener() 메소드
- 익명 함수로 이벤트 리스너 작성 : 함수 이름 없이 필요한 곳에 함수의 코드를 바로 작성, 코드가 짧거나 한 곳에서만 사용하는 경우, 익명 함수 편리하다.
예)

|
1
2
3
4
5
6
7
8
9
10
11
12
13
14
15
16
17
18
19
20
21
22
23
24
25
26
27
28
29
30
31
32
33
34
35
36
37
38
39
40
|
<!DOCTYPE html>
<html lang="en">
<head>
<meta charset="UTF-8">
<meta name="viewport" content="width=device-width, initial-scale=1.0">
<title>Document</title>
<script>
var p;
function init(){
p = document.getElementById("p");
// 첫번째 등록방법
p.onmouseover = over; //over function 호출을 등록
p.onmouseout = out;
// 두번째 등록방법
p.addEventListener("mouseover", over);
p.addEventListener("mouseout", out);
//세번째 : 익명함수
p.addEventListener("mouseover", function(){
p.style.backgroundColor = '#B2EBF4';
});
p.addEventListener("mouseout", function(){
p.style.backgroundColor = 'white';
});
}
function over(){
p.style.backgroundColor = '#B2EBF4';
}
function out(){
p.style.backgroundColor = 'white'
}
</script>
</head>
<body onload="init()">
<h3>DOM 객체의 이벤트 리스너 프로퍼티에 함수 등록</h3>
<hr>
<p id="p">마우스 올리면 색이 변경됩니다.</p>
</body>
</html>
http://colorscripter.com/info#e" target="_blank" style="color:#4f4f4ftext-decoration:none">Colored by Color Scripter
|
http://colorscripter.com/info#e" target="_blank" style="text-decoration:none;color:white">cs |

6. 이벤트 객체 (event object)
- 발생한 이벤트에 관련된 다양한 정보를 담은 객체
예) mousedown 이벤트의 경우, 마우스 좌표와 버튼 번호 등
keydown 이벤트의 경우, 키 코드 값 등
- 이벤트가 처리되고 나면 이벤트 객체 소멸
- 이벤트 객체 전달 : 이벤트 객체는 이벤트 리스너 함수의 첫 번째 매개변수에 전달
① 이름을 가진 이벤트 리스너

② 익명 함수의 경우

③ HTML 태그에 이벤트 리스너 : event 라는 이름으로 전달

|
1
2
3
4
5
6
7
8
9
10
11
12
13
14
15
16
17
18
19
|
<!DOCTYPE html>
<html lang="en">
<head>
<meta charset="UTF-8">
<meta name="viewport" content="width=device-width, initial-scale=1.0">
<title>Document</title>
</head>
<body>
<p id="p">마우스를 올려 보세요.</p>
<button onclick="f(event)">클릭하세요.</button>
<script>
function f(e){
alert(e.type);
}
//p태그에 마우스가 over 됐을 때 f 함수 등록
document.getElementById("p").onmouseover = f;
</script>
</body>
</html>
http://colorscripter.com/info#e" target="_blank" style="color:#4f4f4ftext-decoration:none">Colored by Color Scripter
|
http://colorscripter.com/info#e" target="_blank" style="text-decoration:none;color:white">cs |
7. 이벤트 객체에 들어 있는 정보
- 현재 발생한 이벤트에 관한 다양한 정보 : 이벤트 객체의 프로퍼티와 메소드로 알 수 있음
- 이벤트의 종류마다 조금씩 다름 : 이벤트 객체의 공통 멤버

- target 프로퍼티 : 이벤트 타겟 객체 가리킴
이벤트 타겟 : 이벤트를 유발시킨 DOM 객체
8. 이벤트의 디폴트 행동 취소, preventDefault()
- 특정 이벤트에 대한 HTML태그의 기본 행동
- 사례
<a>의 click 이벤트의 디폴트 행동 : 웹 페이지 이동
Submit 버튼의 click 이벤트의 디폴트 행동 : 폼 데이터 전송
<input type=“checkbox”>의 click 이벤트의 디폴트 행동 : 체크박스선택
- 이벤트의 디폴트 행동을 막는 방법
① 이벤트 리스너에서 false 리턴

② 이벤트 객체의 preventDefault() 메소드 호출

- 이벤트 객체의 cancelable 프로퍼티가 true인 경우만 취소 가능
|
1
2
3
4
5
6
7
8
9
10
11
12
13
14
15
16
17
18
19
20
21
22
23
24
25
|
<!DOCTYPE html>
<html lang="en">
<head>
<meta charset="UTF-8">
<meta name="viewport" content="width=device-width, initial-scale=1.0">
<title>Document</title>
<script>
function query(){
ret = confirm("YOUTUBE로 이동하시겠습니까?");
return ret;//true or false
}
function noAction(e){
e.preventDefault(); //이벤트 강제 취소
}
</script>
</head>
<body>
<h3>이벤트의 디폴트 행동 취소</h3><hr>
<a href = "https://www.youtube.com/channel/UCVrhnbfe78ODeQglXtT1Elw" onclick="return query()">YOUTUBE</a><hr>
<form>
<input type="checkbox">빵<br>
<input type="checkbox" onclick="noAction(event)" /*disabled*/>술<br>
</form>
</body>
</html>
http://colorscripter.com/info#e" target="_blank" style="color:#4f4f4ftext-decoration:none">Colored by Color Scripter
|
http://colorscripter.com/info#e" target="_blank" style="text-decoration:none;color:white">cs |

9. 이벤트 흐름
- 이벤트가 발생하면 window 객체에 먼저 도달하고, DOM 트리를 따라 이벤트 타겟에 도착하고, 다시 반대 방향으로 흘러 window 객체에 도달한 다음 사라지는 과정
- 이벤트가 흘러가는 과정
캡쳐 단계(capturing phase)
이벤트가 window 객체에서 중간의 모든 DOM 객체를 거쳐 타겟 객체에 전달되는 과정
이벤트가 거쳐가는 모든 DOM 객체(window포함)의 이벤트 리스너 실행
버블 단계(bubbling phase)
이벤트가 타겟에서 중간의 모든 DOM 객체를 거쳐 window 객체에 전달되는 과정
이벤트가 거쳐가는 모든 DOM 객체(window포함)의 이벤트 리스너 실행
- DOM 객체에는 캡쳐 리스너와 버블 리스너 두 개 모두 작성할 수 있음
|
1
2
3
4
5
6
7
8
9
10
11
12
13
14
15
16
17
18
19
20
21
22
23
24
25
26
27
28
29
30
31
32
33
34
35
36
37
38
|
<!DOCTYPE html>
<html lang="en">
<head>
<meta charset="UTF-8">
<meta name="viewport" content="width=device-width, initial-scale=1.0">
<title>Document</title>
</head>
<body>
<p style="color:#747474">이것은
<span style="color:#B5B2FF" id="span">문장입니다.
</span>
</p>
<form>
<input name="s">
<input type="button" value="테스트" id="button">
<hr>
</form>
<div id="div" style="color:#FFC19E"></div>
<script>
var div = document.getElementById("div");//이벤트 메세지 출력 공간
var button = document.getElementById("button");
document.body.addEventListener("click", capture, true);//true : 캡쳐과정, window -> targetTag 전달
button.addEventListener("click", bubble, false);// false : 버블 과정, targetTag -> window 전달
function capture(e){
obj = e.currentTarget;//현재 이벤트를 받은 DOM 객체
tagName = obj.tagName;
div.innerHTML +="<br>capture 단계" + tagName + "태그" + e.type + "이벤트";
}
function bubble(e){
obj = e.currentTarget;
tagName = obj.tagName;
div.innerHTML +="<br>bubble 단계" + tagName + "태그" + e.type + "이벤트";
}
</script>
</body>
</html>
http://colorscripter.com/info#e" target="_blank" style="color:#4f4f4ftext-decoration:none">Colored by Color Scripter
|
http://colorscripter.com/info#e" target="_blank" style="text-decoration:none;color:white">cs |

'화면구현' 카테고리의 다른 글
| onblur와 onfocus (0) | 2020.03.12 |
|---|---|
| 마우스 핸들링, oncontextmenu, 이미지 로드, onload, new Image() (0) | 2020.03.12 |
| 문서의 동적 구성 (0) | 2020.03.12 |
| document의 열기와 닫기, open()과 close() (0) | 2020.03.12 |
| document.write()와 document.writeln() (0) | 2020.03.12 |
 rss
rss